Toronto is full of “fixer-uppers” but people gravitate to the polished and staged because the idea of renovating is overwhelming to them; until I decided to give it a shot on my own I felt the same way. After seeing how expensive homes were and how much GCs cost, I thought “I’m a smart woman with experience in the business, Google, cash and time, why would I hire a general contractor when I can do it myself?”
This story is here to inspire anyone who’s been thinking about renovating to take a chance and just do it! There were bumps and subsequent tears along the way – but I also experienced a huge “leveling up”. I took a chance on myself and now am forever equipped with an invaluable skill set I can use for the rest of time.
___________________________
What Happened in January 2017? Well, I got this crazy urge to buy my first freehold home. I had been buying condos and townhouses for years, making a little here and there and finally wanted enough closet space to fit all of my jackets, yes, all of my jackets, ALL year round.
Now, the beginning of 2017 was insane.. everyone thought it would be the last time anyone would ever be able to buy a home in history and I fell for the hysteria.
In March I found a home that showed poorly; it was priced for a bidding war and I went to the dead open house one Saturday afternoon. I remember walking in and thinking “ It smells like cat pee and cigarettes; it’s perfect”. I knew the listing agent and asked that he let me know if there weren’t a lot of offers so I could have a chance at winning. I ran the idea by my boyfriend and dad and they both told me to “absolutely NOT buy it” so of course, I did…
The thing about this home is that I saw it’s potential. It was on a laneway so I could get bins in the backyard to do the demolition work and it already had a basement walkout exit (from a 6-foot high basement). Because it was on a laneway I knew I would also be able to build a parking spot into the backyard.
Needless to say in early March I won the bidding war and was granted possession early June 2017. By then the market had softened a little and I was well on my way to designing my Parkdale palace.
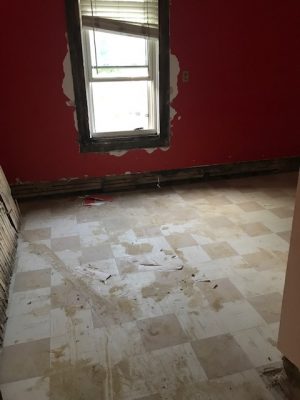
Here’s the home before:


THE BEGINNING:
Before I did anything I had someone do architectural drawings of the existing structure with full measurements. I then took my drawings to Bedford Brooks Design to design the layout. Bedford Brooks is fantastic, they didn’t charge me a gazillion dollars and then I went on to do the contracting myself.
The next step in my renovation process was getting a quote from a company to dig out and underpin my basement, I wasn’t going to be able to afford living there without a basement rental ( and who needs all that space anyway?).
Maximum General Contracting did the permits, digging, concrete pouring, plumbing stack placements and such, I gave them my drawings for the basement apt and they did the work accordingly (this cost $55k). I remember spending an additional $3500 to change the lead pipe that was bringing water in from the city – lead pipes are a no-no these days. Things like this came up a lot, but I had anticipated them happening.
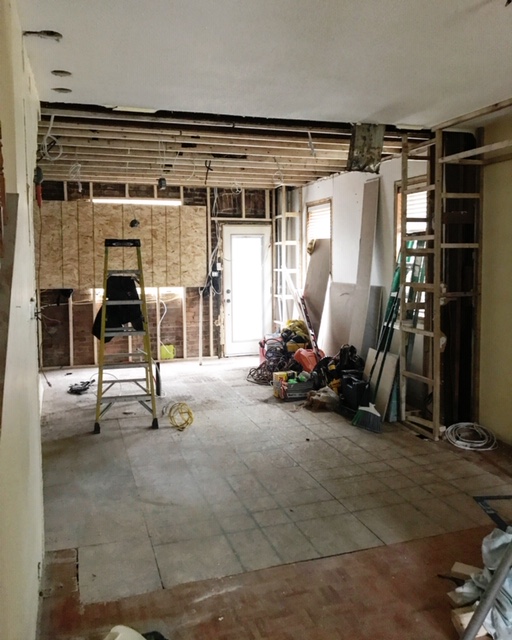
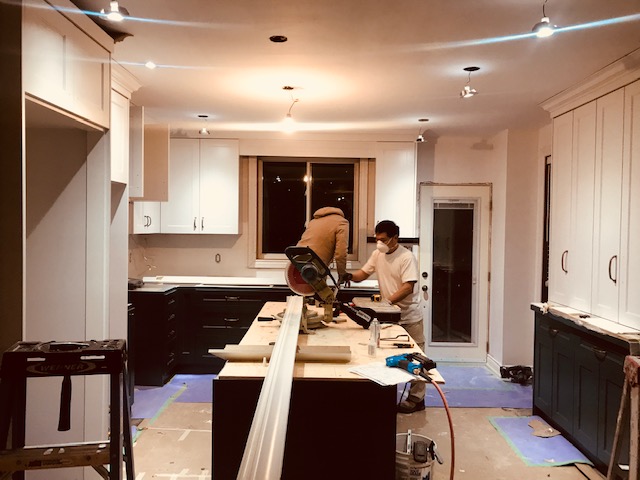
The basement dig-out process took 6 to 8 weeks ( I can’t remember now) and while they were doing it I had contractors demolish the upstairs bedrooms so I could put in mostly new drywall, all new closets trim and floors.
I wish I could say that I did everything the way I should have – but it was my first time and had to make mistakes along the way. I seemed to do the house in pieces instead of all at once. I should have gutted the whole thing at one time instead of hiring different people as the months progressed – but c’est la vie!
THE MIDDLE:
When the basement was finished It was time for me to contact an HVAC company to install ducts so I could have forced air and air conditioning throughout. The old house had baseboard heaters and no AC ( that wasn’t going to fly for this lady).

I had drawings and permits done for the HVAC and the guys at HATCO heating and air conditioning did the work for me. This process took weeks and cost around 15k in total to install ducts, a new HVAC, AC – I thought that was pretty good for the central nervous system of a home.
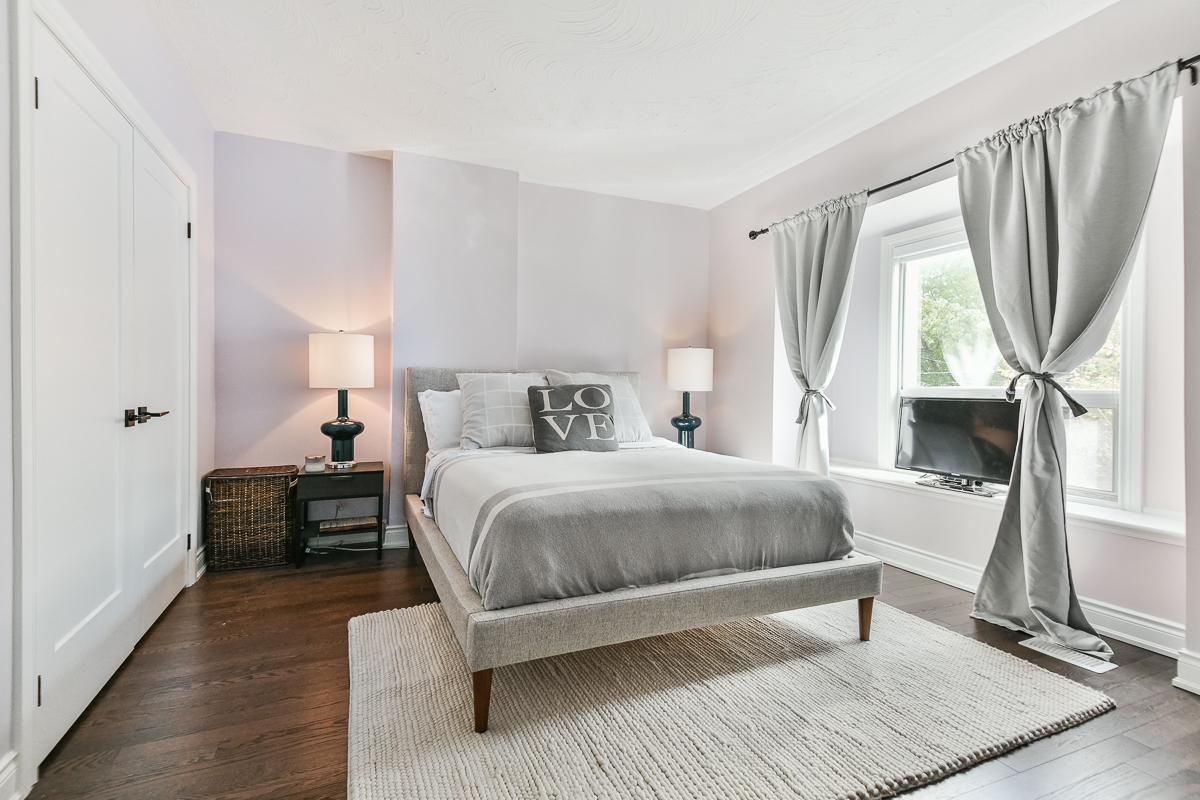
After the upstairs closets, walls and trim ( new baseboards, doors, and casings) had been finished I decided to lay down flooring so I could at least have a bedroom to sleep in.
I left the walls and the shower in the upstairs bathroom. Changing floor tiles, paint colour, vanity, and toilet is pretty easy stuff and can be done in 2 days.
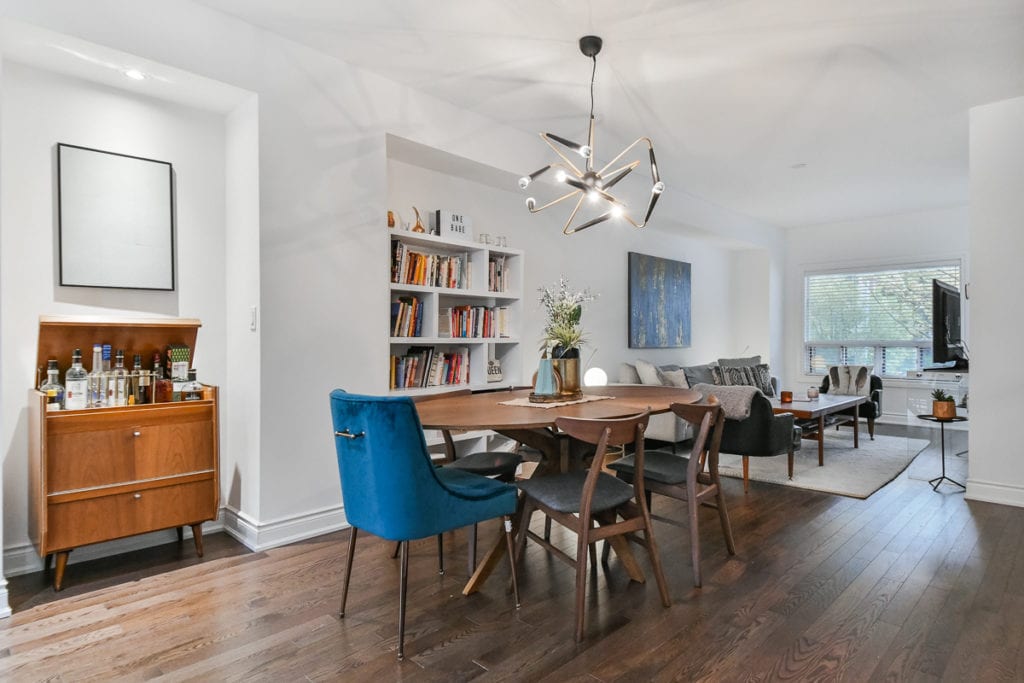
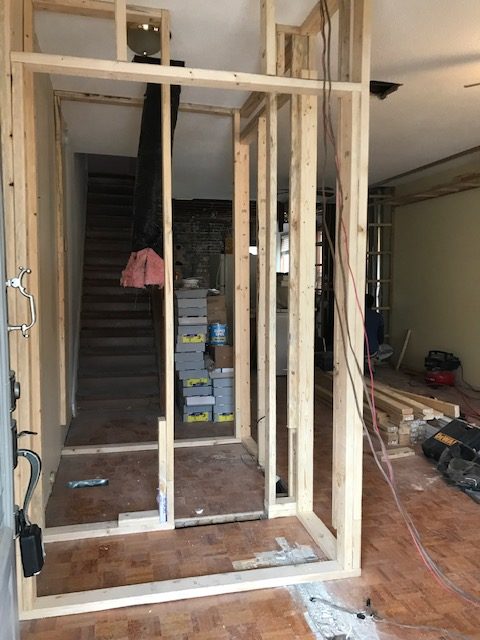
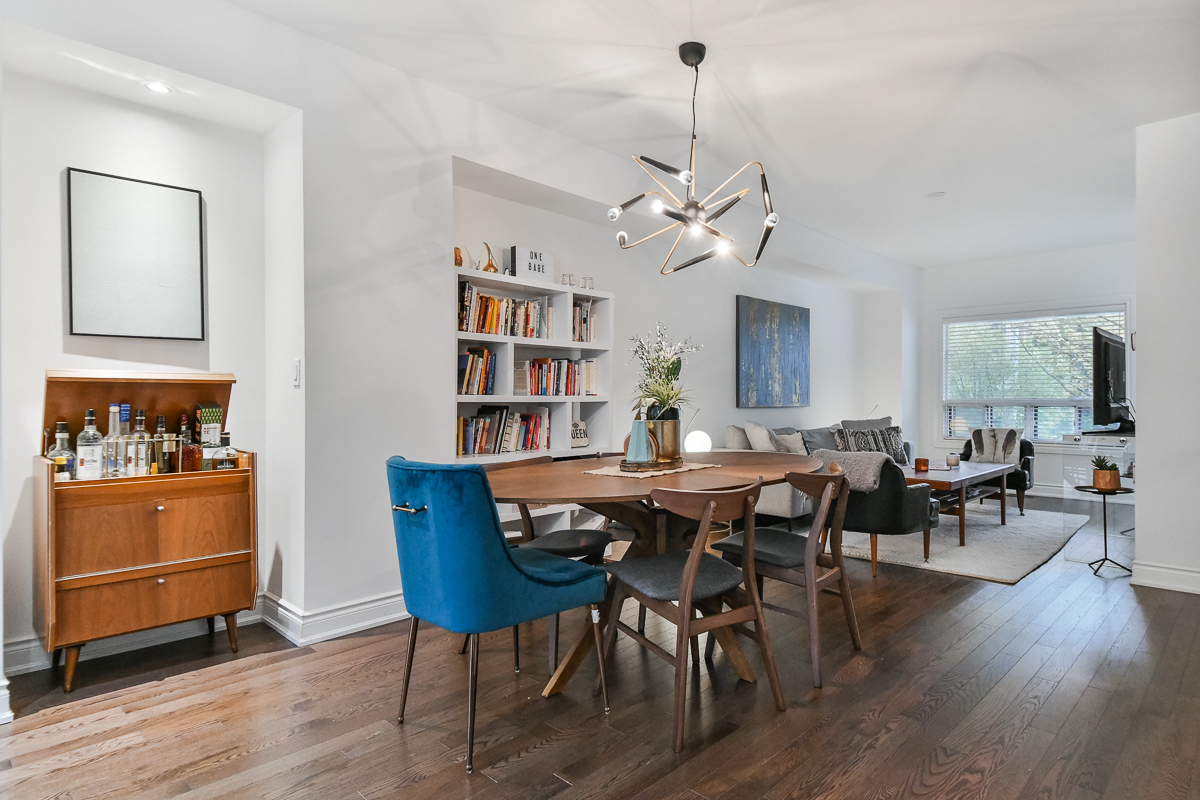
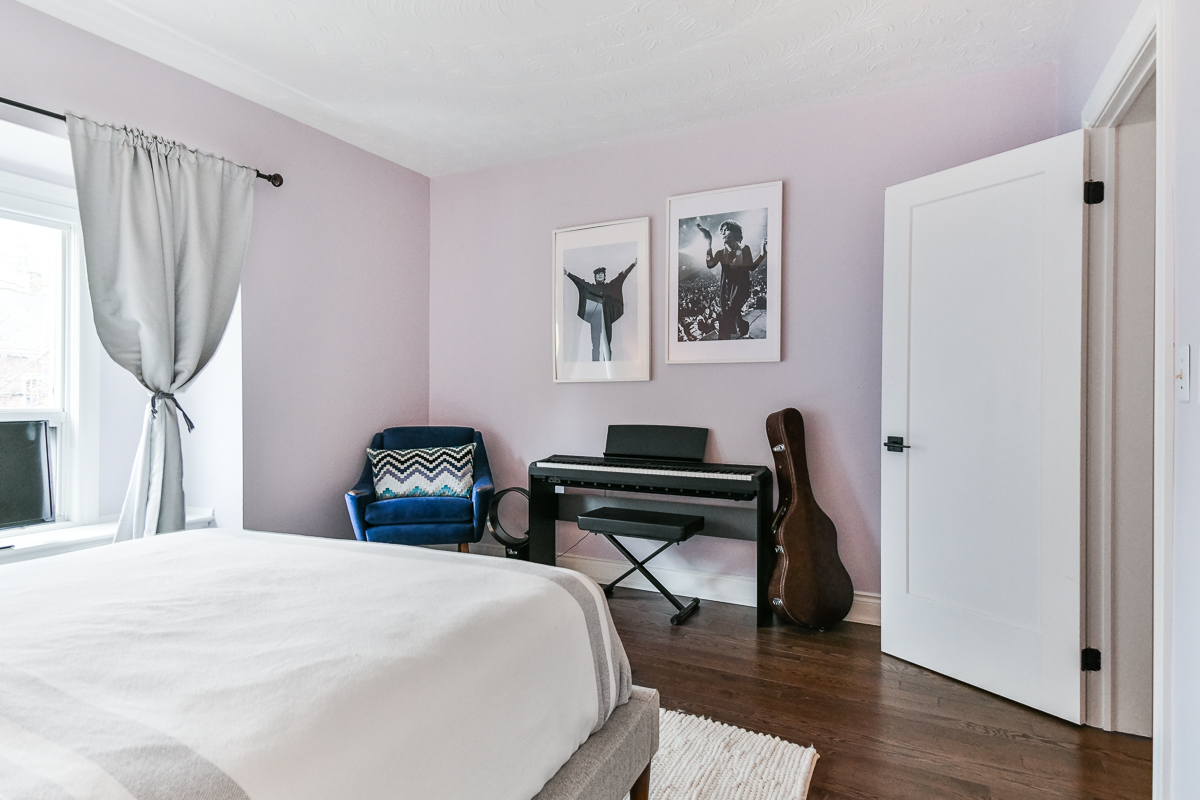
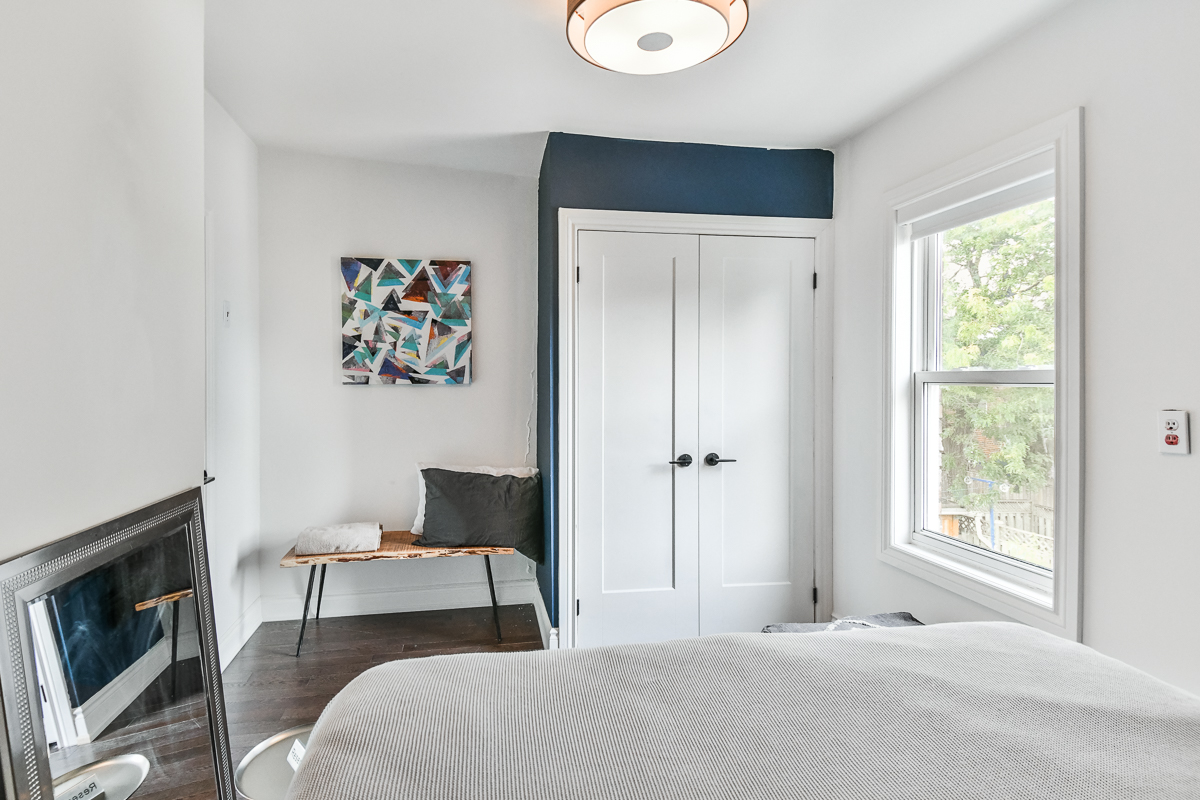
The main floor was essentially demolished completely, I took down all of the interior walls, ceilings, changed the electrical, the plumbing, the entire configuration and designed something that worked better for my tastes.
I wanted a nice bathroom and coat closet at the front but couldn’t quite figure out how that wouldn’t look awkward in such an open concept space. The wildly talented Peter Brooks designed a functional two-piece and closet that I couldn’t imagine not having now – I’m so grateful for him and his work.
My floors weren’t level so I had a framer “sister” the joists ( this means putting another beam right beside the old one) to give more support to the places where the floor was “sagging”. This made the home feel super sturdy and now nothing ‘creaks’.
I know a lot of people like that brown and white look for their riser and treads on their stairs but there is nothing ‘Farmhouse Chic” about me; I don’t like shiplap, I don’t like barn doors and I certainly wasn’t going to pull that look through a stair design. I went with a 60’s mid-century modern motif I found on Pinterest and I LOVE it – every time I look at the case I think “God that is so much cooler”.
I found that the home, although South facing, didn’t have a lot of light coming in and so I knew a large back window would help. I cut a 4×4 hole into the back brick and put a big bright picture window in so I could watch my backyard guests entertained. The construction and supplies cost me $1300 in total.
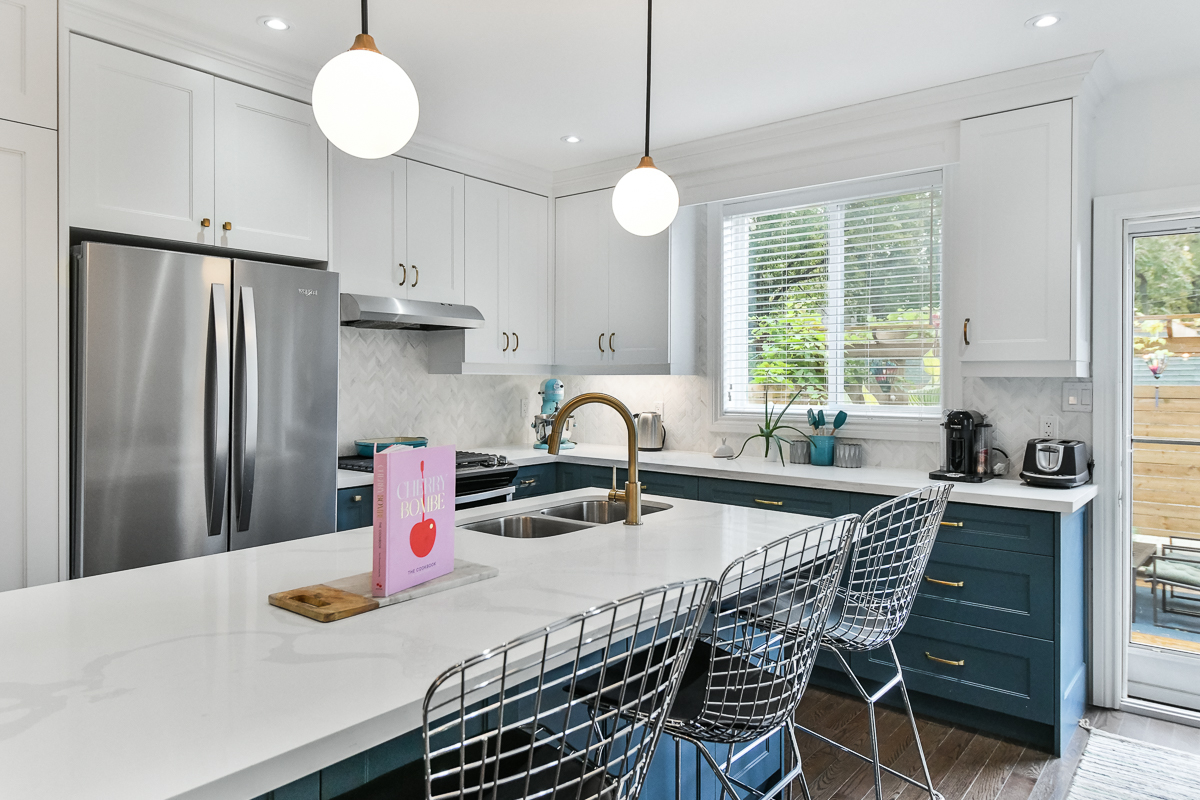
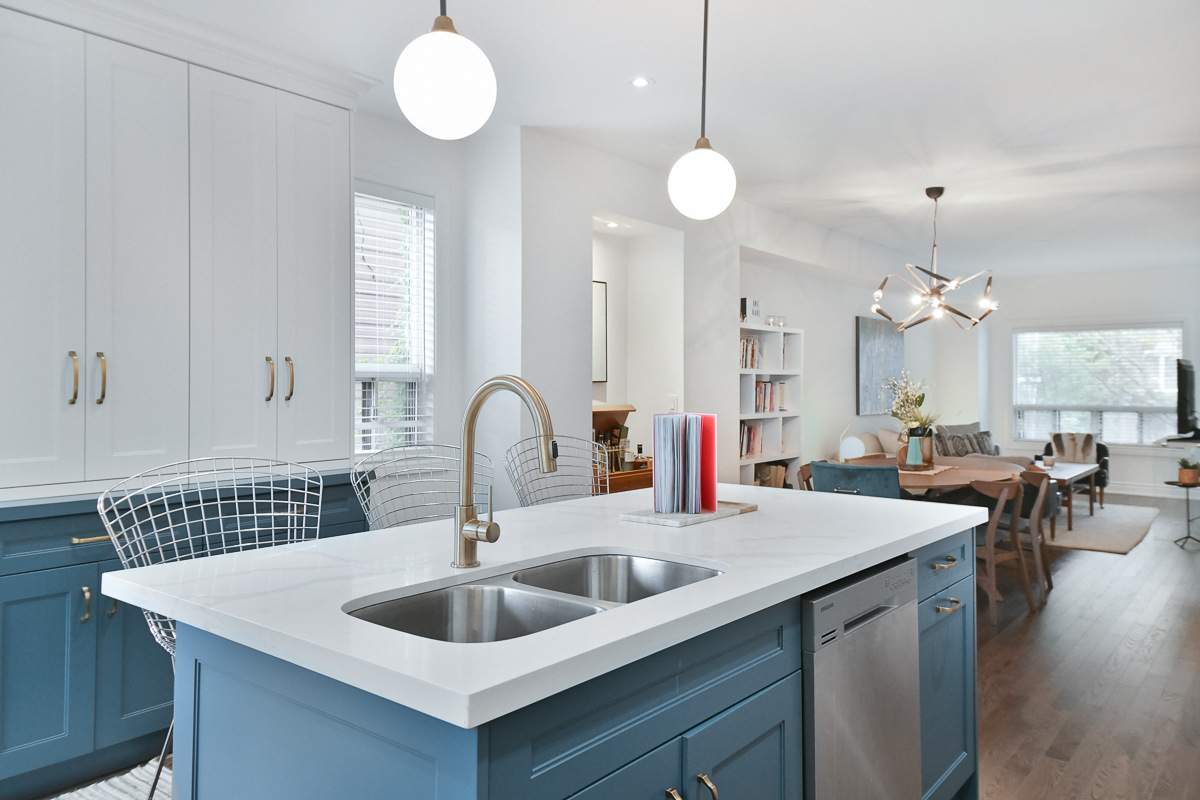
What didn’t cost me $1300 was my kitchen, the heart of the home. Now I had such a specific aesthetic for the kitchen in mind and I wasn’t going to waiver. Kitchen’s can be quite expensive so I decided to use someone less known from Scarborough ( also a Bedford Brooks recommendation that saved me $$$$) they supplied the cabinets, counters and installed it all (call me for details).
The kitchen suppliers let me pick whatever Benjamin Moore paint colour I wanted for the cabinetry and I provided my own brass hardware to make it “OH SO 2018”.
I decided on a herringbone backsplash that I found at Olympia Tile that quickly became the showstopper material in the house. The installation on that product needs to be perfect and I watched the installer like a hawk.
That’s the thing about managing your own renovation and not having a GC, you need to show up to the site every day and make sure your workers are doing things correctly and on time. If you leave them to their own timelines and standards you’re risking delays and subpar work.
A LITTLE SECRET:
I purchased the appliances at Best Buy on the Thursday of “black Friday” DEAL OF THE YEAR – I saved $2,000 and bought them all at one time. Go into the store and tell them you want the next day deals; you avoid things being sold out and don’t have to deal with crowds.
THE BASEMENT:
The basement was a no-brainer basic one bedroom that has lots of pot lights, a simple kitchen, big bedroom, and laundry – my tenant is happy I only have dance parties every other weekend and we’ve finally learned the garbage schedule together 🙂
THE FINISHING STUFF:
Painting, wallpaper, light fixtures, blinds – these are all things that will cost you more than you had anticipated. I found that blinds to go was good enough for me and that Wayfair had sales on light fixtures that no store could match (although I did indulge in a few ELTE pieces along the way).
I can’t imagine my life without my custom closets now; I never leave clothing on a chair or hook anymore – I used Gurdy at Space Age Closets; she’s fantastic.
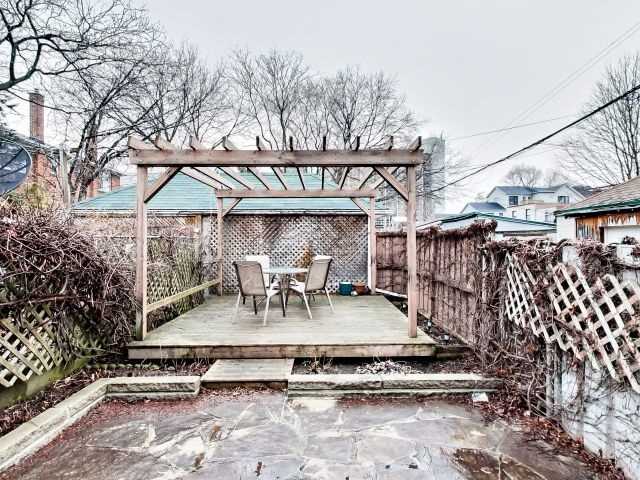
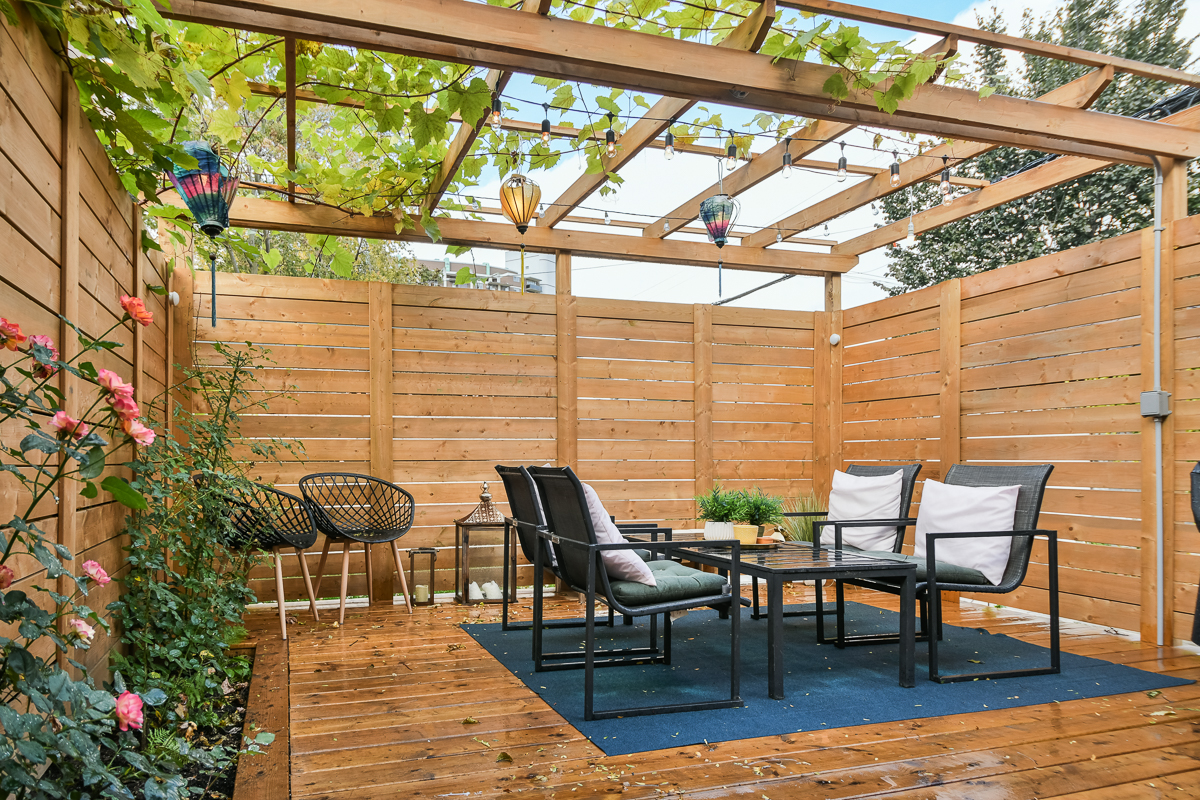
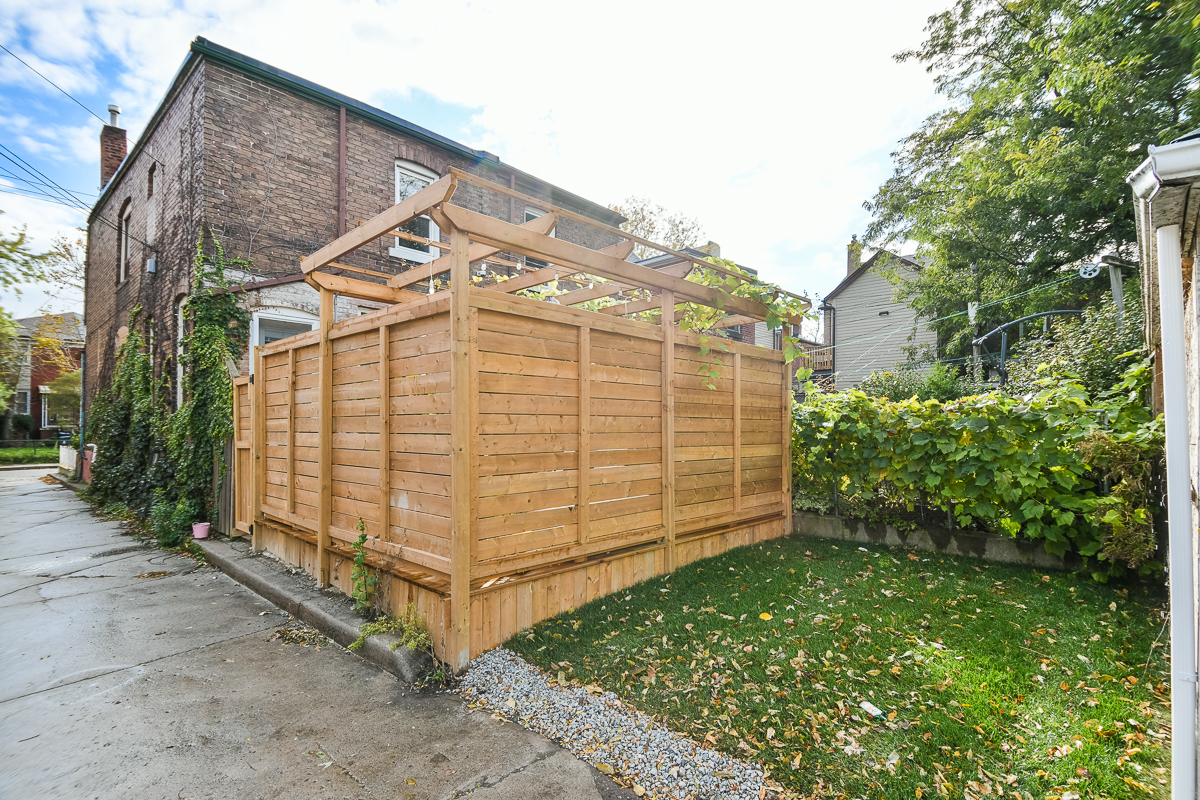
Pinterest became my bible for my backyard. “Boho chic” must have been searched 100 times until I got the right look. I wanted a pergola where I imagined leaves growing atop, lights strung and plants planted below – thanks to the neighbour’s grape leaves this was accomplished.
THINGS I LEARNT IN THE PROCESS:
LED lights make rooms look like a science lab and all pot lights should be soft light on dimmers.
Light switch plates should go closest to the edge of the wall and should be nearest to the light they are controlling.
Baseboards are a dead-give-away that your home is older – replace those and you’re in the modern decade.
Walking spaces (halls, the distance between island and cabinets etc) should be 3 feet wide or more, less than that and spaces seem too narrow.
Always opt for a bigger kitchen with a large island and a smaller dining/living area. If you have a party of 30 people, 28 of them will hang out in your small kitchen and two will hang out on the couch – this is scripture.
Measure three times and cut once – Thanks Dad 🙂
A pony panel can save you time and money from upgrading your old electrical panel + saying “pony panel” is always fun.
Everything seems hard until you do it the first time and you CAN do anything with the help of the right experts with advice.
If you want to buy a house and do a project I’m here to help you in any way I can.
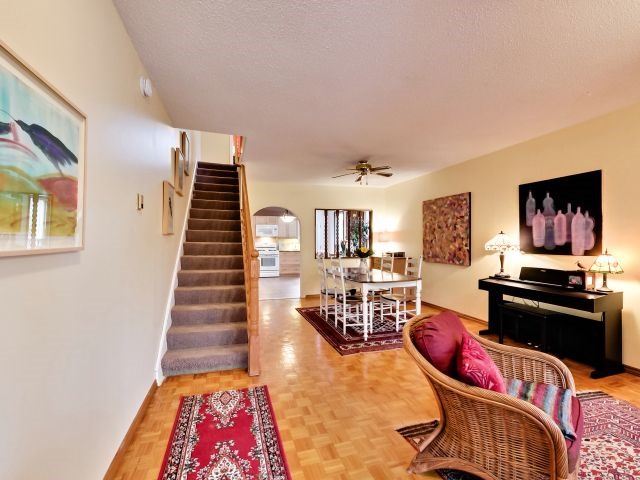
THE FINISHED PRODUCT


2 Comments
Comments are closed.


Great read. Very impressed at the process and thank for the details.
Thanks for reading!